Sunday, March 25, 2007

I is for Idli with Vegetables

The myriad cuisines of India all love their vegetables! Veggies are diced and sliced, grated and mashed, stir-fried and curried into hundreds of vegetable dishes. In this series, the A to Z of Indian Vegetables, we take an alphabetical journey through the various avatars of vegetables relished in Indian cuisine. For each letter, we will make a tasty vegetable dish that illustrates one manner in which vegetables are savored in India.

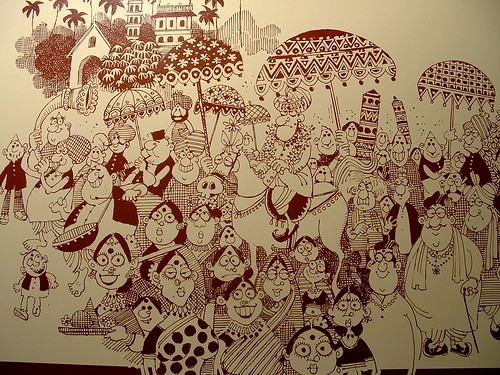
The "I" of Indian Vegetables

The letter I inspired twelve incredible Indian flavors! It is a difficult letter to come up with foods for, and I'm so amazed at the creativity of the participants. When I complained about the lack of I vegetables to V, he immediately said, "Well, there is iceberg lettuce. You could make iceberg lettuce wrapped around some grilled paneer tikka or something". Hmm...I don't give the man enough credit :) I was amused and impressed all at the same time.

To start off, two I vegetables...

First up, the tapering, crunchy, fluorescent green Italian Peppers, also called Cubanelle peppers. New food blogger Sapna of Indian Monsoon cooks these Italian Peppers, Indian Style in a delightful stir-fry using both chickpea flour and peanuts to add panache to the dish. Read the post to find out why she would call these peppers salad mirch in India!

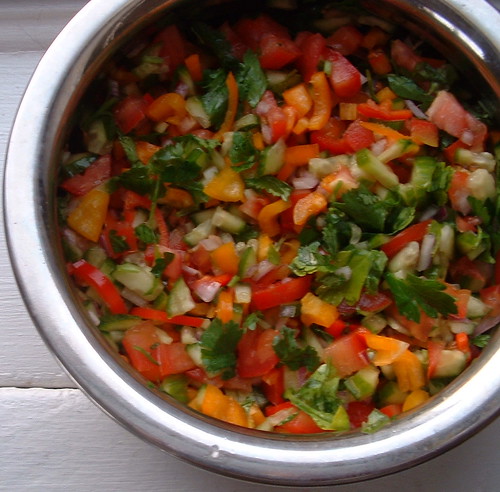
Next comes Imli or tamarind. Many cuisines prize the fruit of the tamarind tree for its tangy pulp that is used to flavor everything from the Indonesian pad thai to Indian chaats to Worchestershire sauce! But Suma of Veggie Platter takes it one step ahead. She uses the *leaves* of the tamarind tree (imli ke paththe in Hindi) and makes a delicious and tangy Imli ke Paththon ki Dal.

Sandeepa of Bong Mom's Cookbook writes a beautiful description of her childhood memories surrounding Imli, and combines raw tamarind with raw papaya to make a sweet-'n-sour Papaya Tamarind Chutney.

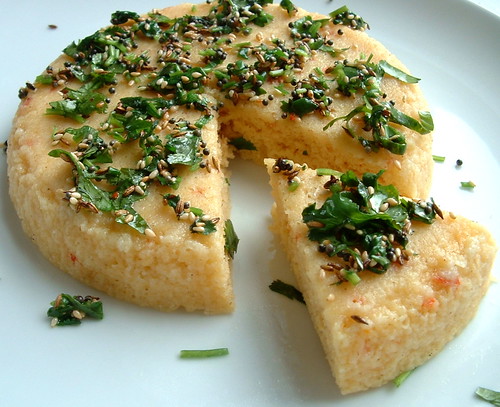
Up ahead, we have a complete brunch buffet, for one of India's most popular breakfast foods is an "I" food, the Idli. The most well-known idli starts with a fermented batter of ural dal (split black lentils) and rice, steamed to perfection in little molds. Here we have four different veggie-fied variations of the ever-beloved idli!

A popular variation of the idli is the rava idli, also called the instant idli because it does not require fermentation, made with semolina/rava/cream of wheat. Asha of Aroma/Foodie's Hope tweaks the recipe by adding chana dal, carrots and green peas, and cooks up some colorful and nutritious Idlis with Chana Dal and Vegetables.

Usually, idlis are made with a big batch of batter, and it is quite common to have some left over. What do you do with them? Here are two innovative ideas for recycling those leftover idlis into tasty preparations!

Suma of Veggie Platter takes the bland steamed idlis and jazzes them up with some vegetables, nuts and seasoning to make a delicious Idli Upma.

A very innovative use of leftover idlis is Idli Manchurian by Swapna of Swad. Small squares of idlis are batter-fried, then dipped into a green pepper-green onion sauce in the typical tasty style of Indo-Chinese fusion cuisine.

Remember Prajakta, who mailed in her entry for green tomato chutney last week? This week, lo and behold, she has her very own food blog, called "swaypakghar" (the Marathi word for kitchen)! So here we have Prajakta of Swaypakghar using the Idli Rava, ground rice that is typically used for making idli batter, to make delicious savory pancakes called Idli Rawyache Appe.

Let's not forget that I also represents a magic word in the dictionary of the busy cook: Instant! Don't get me wrong; I am completely willing to make time-consuming and involved dishes, but every so often, life gets busy and demands that we have some "instant" recipes tucked away in our repertoire. The pressure cooker is one reliable route for instant (not to mention fuel-saving and nutrient-conserving) meal prep. Richa of As Dear As Salt shares a delicious recipe for Instant Pineapple Jam (complete with a Marathi transliteration) using only pantry ingredients and a short amount of time!

And now for four regional specialties...

Bee and Jai of Jugalbandi come up with a beautiful bowl of Istu, a creamy coconut-based vegetable curry. You probably guessed it, but Istu is the Malalayam (the language of Kerala) version of the English word "stew"!

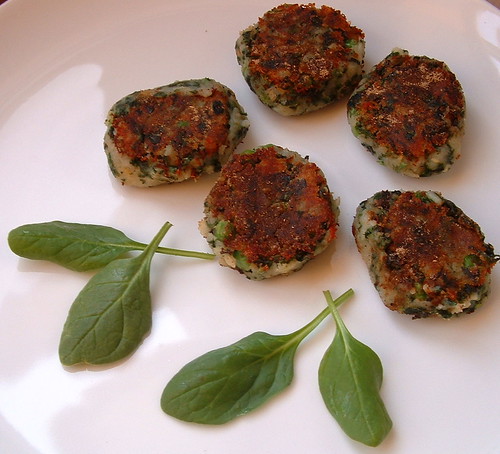
Sheela of Delectable Victuals makes her favorite comfort food, Idi Chakkai. She explains that Idi Chakkai translates as "pounded jackfruit" and this milk curry of tender raw jackfruit certainly looks comforting to me!

Sigma of Live To Eat also goes back to her roots in Kerela and talks about Ilaneer, which means tender coconut water in Malayalam. If you have ever tasted the tender drink from the coconut, you know that it is a little taste of heaven! Sigma mixes up the tender coconut water into a sweet and refresing Ilaneer Drink that looks just perfect for the summer months ahead!

Linda of Out Of The Garden does some clever culinary research and found that irulli means "onion" in Tamil! She promptly goes on to mix some Indian flavors into the New England classic combination of apples and onions and comes up with a delicious dish of Fried Onions and Apples!

************************************************************
I is for Idli with Vegetables: Vegetables for Breakfast

Breakfast is certainly my favorite meal. In stark contrast to those folks who are loathe to consume anything more solid than a cup of coffee before noon, I can put away vast quantities of food at six in the morning. And it does not have to be traditional breakfast fare either, leftover dinner suits me just fine. But I do have one picky issue: I don't really like sweet foods for breakfast. Lucky for me, traditional Indian breakfasts fit all my criteria: they tend to be both heavy and savory.

Since we are all trying to eat several servings of vegetables through the day, I love the idea of eating vegetables at breakfast to give a head-start to the day's veggie consumption. Traditional Indian breakfast dishes do offer plenty of ways to do this. Here are some examples of breakfast eaten in different parts of India:

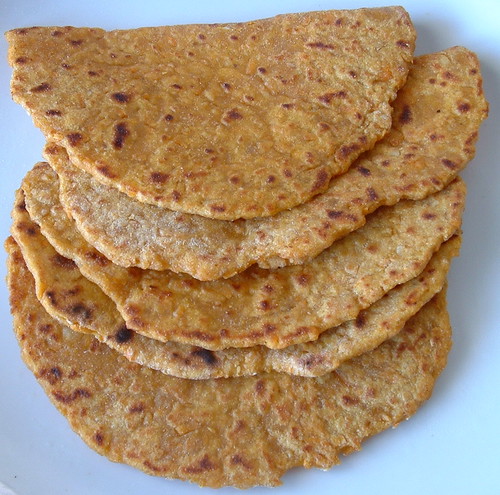
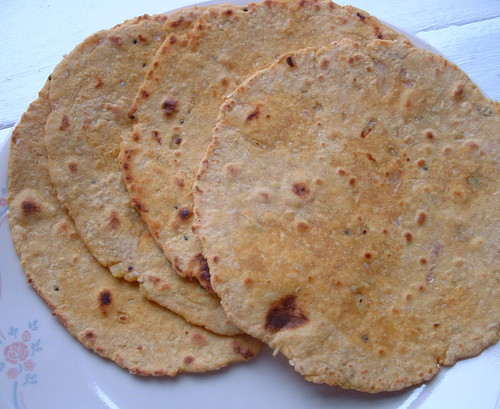
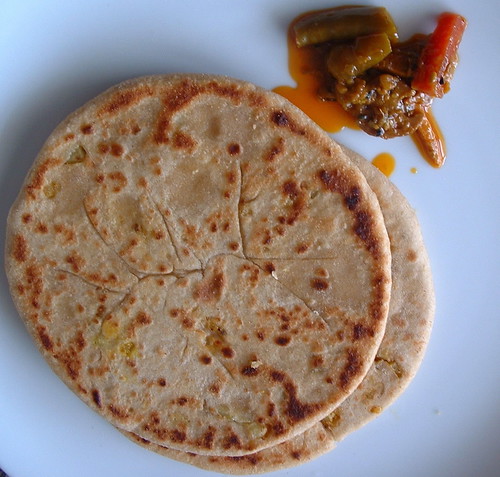
In the North of India, a predominantly bread-eating region, you are likely to find parathas for breakfast. We talked about parathas quite a bit during the gobi paratha post. Parathas stuffed with vegetables (potatoes, cauliflower, mixed vegetables) are served with yogurt and a spicy tangy pickle. If you were to chop up some salad vegetables (cucumbers, tomatoes, carrot, radish, onion) and stir in some yogurt and cumin to make a raita, the combination of stuffed paratha and raita is both filling and nutritious!

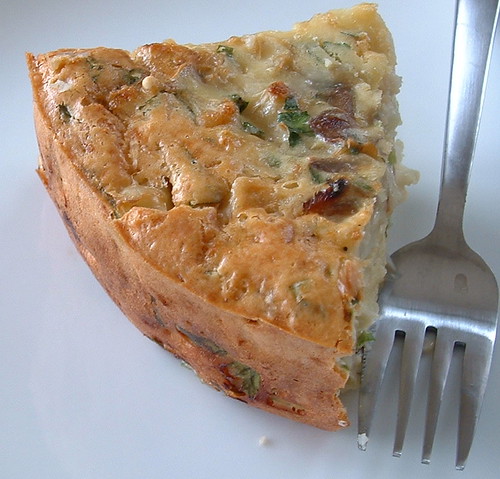
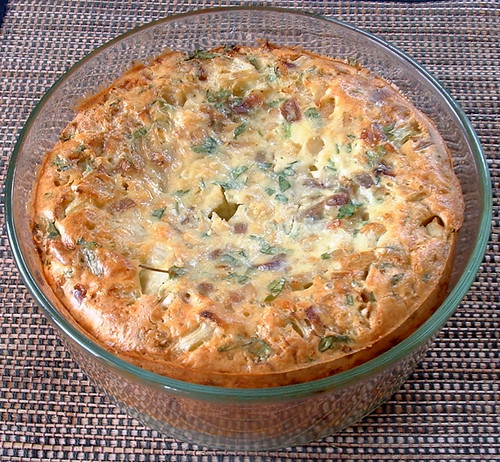
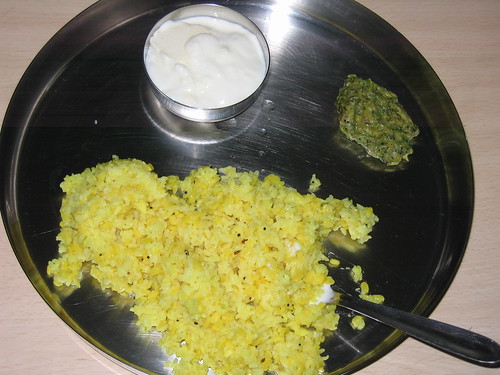
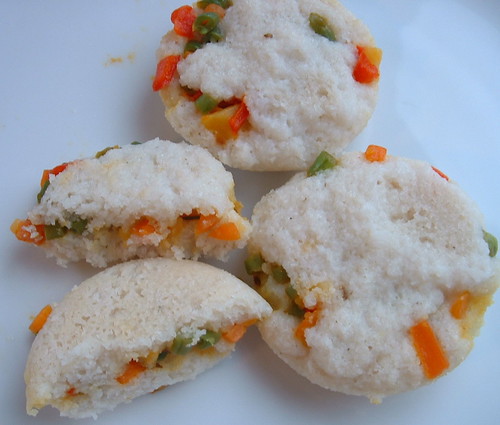
In the South of India, breakfast is dominated by foods made with a fermented batter of urad dal and rice: idlis, dosas and all their delicious variations. Typically, these will be served with a coconut chutney and sambar, an aromatic dal with vegetables. In my mind, the fluffy steamed idlis served with a vegetable sambar represent one of the most wholesome breakfast foods on this planet. This combination has very little added fat, but is packed with nutrition and taste. I really wanted to make idlis for this segment (and I confess, it was about the only "I" food I could come up with), and googled vegetable idli. The recipe that follows is pure experimentation based on ideas gleaned from a variety of recipes online.

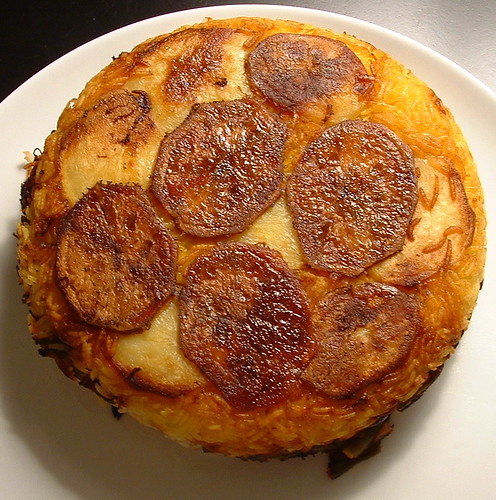
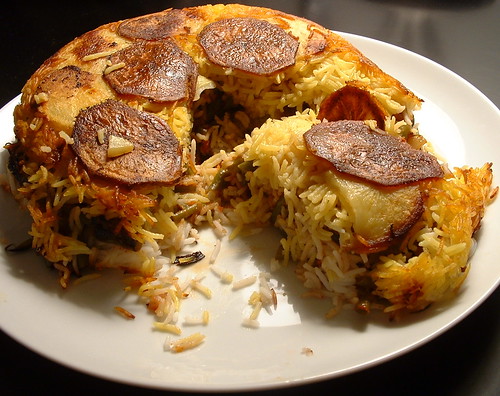
Tiny diced vegetables are sauteed lightly, then sandwiched between dollops of idli batter and steamed. The result is a colorful and tasty variation to the idli. I think the presence of tiny dots of colorful veggies would make this idli quite appealing to little ones. A word of warning to first-time idli-makers: idli, at least soft and fluffy ones, may need a combination of luck and experience to perfect. The exact consistency of idli batter is crucial, and nearly impossible to describe in words. I use my mom's idli recipe for the proportions, but tips from Dakshin helped me a lot in creating soft idlis.

Stuffed Idlis


idli3
(makes about 32 idlis, serves 6-8)
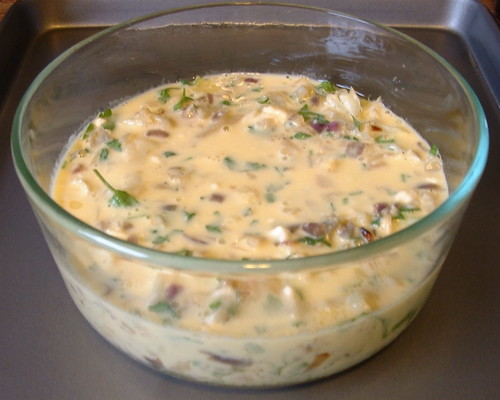
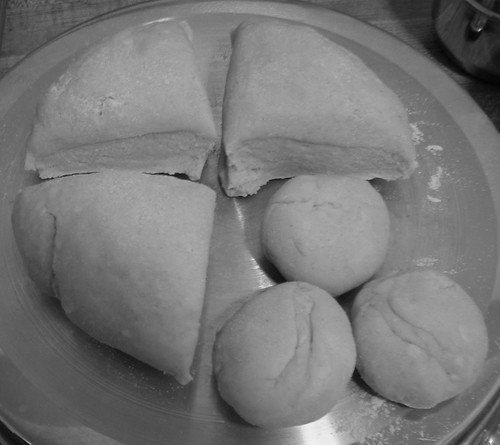
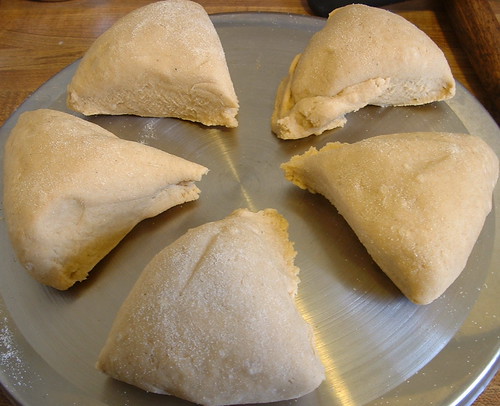
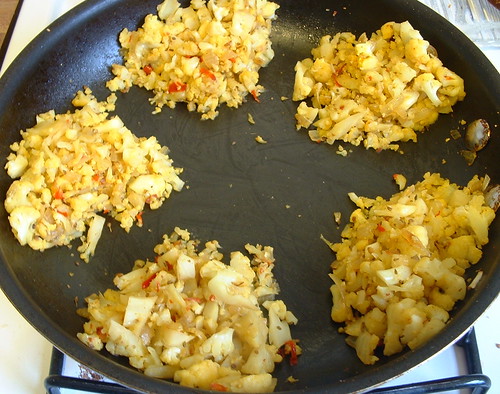
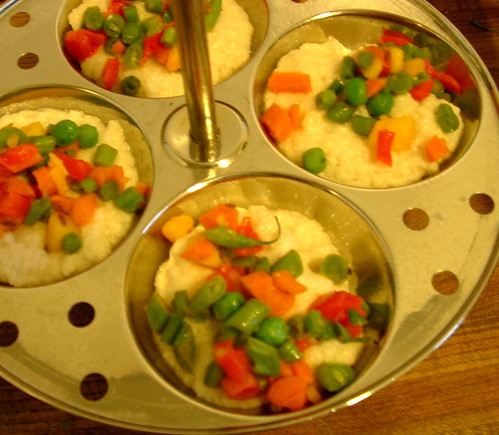
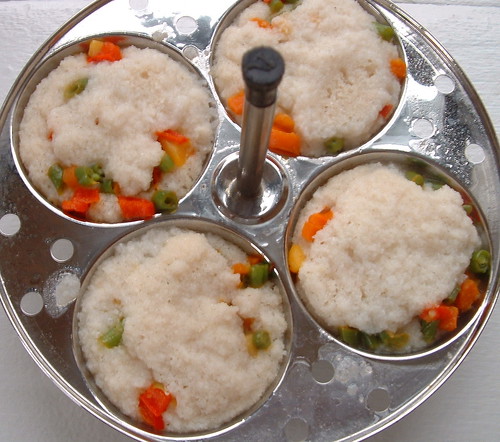
1. Make the filling: heat 1 tsp oil, then temper with 1 tsp cumin seeds. Add 1 cup mixed finely diced vegetables (I used boiled potato, carrot, red pepper, green beans) and saute for a few minutes until barely tender. Season with salt, turmeric and red chili powder. Set the filling aside.
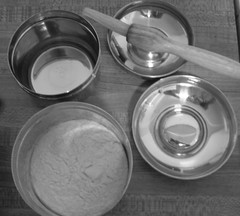
2. Soak 1 cup urad dal overnight in warm water. Drain it (catch the soaking liquid in a bowl) and place it in the bowl of a food processor along with 1 tsp fenugreek seeds. Process the urad dal to a very fine paste, adding some of the soaking liquid if required. It should be very thick.
3. Soak 2 cups idli rava (a special sort of cream-of-rice) for 30 minutes in warm water. Drain most of the water.
4. Mix the urad dal paste, soaked idli rava and 1 tsp salt until well combined. Cover and leave in a warm spot to ferment (I usually need 10-15 hours).
5. When the batter appears fluffy and risen, you are ready to steam the idlis.
6. Grease the idli molds using non-stick spray. Do not mix the batter at all, but scoop it gently into the idli molds. The bubbles trapped in the batter will make the idlis fluffy, so be gentle. To make stuffed idlis, put a half-scoop of batter to cover the bottom of the idli mold. Add a tsp of vegetable filling, then cover with another-half scoop of batter. The picture shows the first half of the batter topped with the filling (in the ugly yellow light of my kitchen).
idli1
7. Steam the idlis for 15-20 minutes or until an inserted toothpick comes clean.
idli2

Variations on a theme
1. This potato-Stuffed Idli from Foodlovers looks delicious!
2. You can, of course, omit the vegetable stuffing and make plain idlis. Try halving steamed idlis and sandwiching them with some vegetable filling or a chutney.

How do you serve this dish?
1. Traditionally, idlis are served with sambar. See sambar recipes from bloggers: Annita, Manisha, Chaipani, and me.

Fellow bloggers have come up with many delicious ways of sneaking in vegetables for breakfast. Here are some of my favorite finds:
Dalia Ravivar from A Mad Tea Party,
Veggie Poha from The Daily Tiffin,
Vegetable Uthappam from Sailu's Food,
Besan ka Cheela from Sugar and Spice,
Methi Matar Paratha from Keep Trying,
Cucumber Pancakes from Food For Thought,

Previously on the A to Z of Indian Vegetables...
A is for Aloo Gobi: North-Indian Stir-Fry
B is for Bharli Mirchi: Stuffed Vegetables
C is for Carrot-Cashew Payasam: Desserts
D is for Dum ki Arbi: Dum Style of Cooking
E is for Egg-Fried Rice: Rice and Vegetables
F is for Foogath: South-Indian Stir-Fry
G is for Gobi Paratha: Vegetables in Breads
H is for Hariyali Tikki: Vegetables in Appetizers

Thursday, March 22, 2007

WBB: The Eggstraordinary Giant Cauliflower Puff

This is my entry for the monthly Weekend Breakfast Blogging, an event show-casing what is certainly my favorite meal of the day. WBB is a brainchild of Nandita from Saffron Trail. This month, WBB is being hosted by Sigma of Live To Eat, and the theme is: EGGS!

A very interesting and illuminating book that I recently read is called What To Eat, written by the much-admired nutritionist Marion Nestle.

To my intense disappointment, I have chosen to live in times (and especially, in a country) where there are food wars being waged all the time! It takes a great deal of effort to shut out the blaring (and often misleading) food advertisements, heated discussions over every nutrient present in food, and the realization that the vast majority of food is produced in factories and not on farms. Reading Marion Nestle's book made me calm down a little. In a sea of food-related hysteria, she is the voice of reason, making her conclusions in an evidence-based manner, guided by unbiased research. What Nestle does is: she walks the reader through the entire supermarket- the dairy aisles, meat section, produce, breads, every aisle that one is likely to visit on the weekly trip to the store- and delves into the issues surrounding each product, coming up with her well-researched conclusion on each issue. If you want to be an informed consumer in the US, this book is a must-read. Her style is engaging and accessible, gently humorous, and lucid, even when she is discussing fairly technical issues. I was surprised at how much I learned.

Today, we are on the subject of eggs for breakfast. Have you ever been faced with a wall of egg cartons where no two look the same? Have you ever screamed in frustration at having to do a sophisticated cost-benefit analysis just to buy a dozen eggs? To give an example of Nestle's work, here are some conclusions that I could make after reading the chapter on eggs:
1. COLOR: The color of egg shells- white and brown- is simply different for different breeds of hens. It has no bearing on the nutritional value whatsoever.
2. SIZE: Extra-large eggs have more nutrients (but also more calories) than large eggs. Large eggs are a more reasonable portion size. The majority of recipes that use eggs call for large eggs, and not extra-large, so for those two reasons, I will be buying large eggs.
3. CHOLESTEROL: All the cholesterol in the eggs is in the egg yolks. Because the yolk is very high in cholesterol, it makes sense for adults to not eat more than one whole egg a day. Even one egg a day is too much if you are consuming cholesterol in fairly large amounts from other sources like meat and dairy. In my home, I make egg dishes twice a week, using 3-4 eggs each time, so V and I each consume about 3-4 eggs a week each. Good enough.
4. SALMONELLA: Egg producers know the safety features that need to be incorporated in order to control the probability of salmonella contamination, but they don't really want to take the trouble or spend the money to do so. They would rather slap on a label that warns us to cook eggs thoroughly, and leave the responsibility to the consumers.
5. DESIGNER EGGS: Eggs that claim to have high amounts of Vitamin E, Omega-3 fatty acids etc. The higher amounts are achieved through the feed- for instance, hens are fed with flaxseeds to get their eggs to contain higher amounts of Omega-3s. For this feature, the price of the eggs is hiked up by 2-3 fold. You may as well eat regular eggs, and eat flaxseeds (or other sources) for the Omega-3s.
6. HUMANE TREATMENT OF HENS: Cartons of eggs often come with various statements saying how the hens were fed and raised. According to Nestle's thorough research, this is what the labels mean:
a) USDA Certified Organic: This is the most reliable seal. It means that hens are only fed organic, vegetarian feed, plus they are raised in sufficient space without over-crowding.
b) Certified Humane: It is a reliable certification for how hens are raised and handled, but they are a little less restrictive about the kind of feed that the hens are given.
c) United Egg Producers Certified: One should be very skeptical about this certification. For all intents and purposes, it is a misleading marketing gimmick.

OK, I'm getting hungry. Let's make some breakfast! Today's recipe comes from a bona fide breakfast cook-book: The Sunlight Cafe by Mollie Katzen.

The book was given to me as a gift by V's brother, and I do love having it on my bookshelf. I can't say I make too many recipes from the book, but it is a great resource for ideas and inspiration. And the name Sunlight Cafe does conjure up images of a leisurely brunch in a sunny cafe with fresh flowers on the table and the sizzle of a waffle iron in the background. I like Mollie Katzen's whimsical illustrations and the playful names she often gives to her recipes: this one, the giant cauliflower-cheese puff, sounds like it came straight out of a Roald Dahl story. The dish is simple enough to make: a filling of cauliflower florets is doused with an eggy-cheesy batter and baked until golden and puffy.

Giant Cauliflower Puff


Slice
(serves 3-4, adapted from Mollie Katzen's The Sunlight Cafe)
1. Preheat the oven to 350 degrees F. Spray a baking dish with baking spray, then coat with a thin film of melted butter (by placing a small pat of butter in the dish, placing it in the pre-heating oven for a couple of minutes to melt it, then tilting the pan to spread the melted butter evenly).
2. Make the filling: Heat 1 tbsp olive oil in a skillet, then saute 1 medium chopped onion, 2 cloves garlic, minced. Add 3 cups cauliflower florets (about half a medium head of cauliflower) and saute for 5-8 minutes until the cauliflower is just starting to brown and become tender (it does not need to cook completely as it will be baked again). Turn off the heat. Season with salt and pepper. Go easy on the salt because the cheese in the batter will be quite salty. Stir in 3-4 tbsp minced parsley. Add the filling into the prepared baking dish
3. Make the batter: In a large bowl, combine 3 large eggs, 1/2 cup milk (I used low-fat), 1/2 cup all-purpose flour and 1/3 cup cheese (I used a combination of shredded Monterey Jack and Brie torn into small pieces). Use a hand blender or regular blender to mix everything into a smooth batter. Pour the batter over the cauliflower in the baking dish. Set the dish on a baking sheet to catch any spills while baking, like so:
PuffBefore
4. Bake for 40-50 minutes, or until puffed and golden. Test with a skewer or knife to make sure that the puff is cooked all through.
PuffAfter
5. Cut into wedges or squares and serve!

The verdict: We enjoyed the giant cauliflower puff immensely! It tastes like a delicious souffle without the fuss. Anyone who likes eggs and savory foods for breakfast will enjoy this. It is wonderful to start the day with a healthy serving of vegetables. Two notes:
1. The recipe is highly flexible: you can use any other vegetables (broccoli, mushrooms, asparagus is suggested by Katzen) or any combination of vegetables. You can use any cheese (or combination of cheeses) that you like, and any herbs.
2. This is a great brunch dish for a crowd. Make the filling ahead of time. Preparing the batter takes only minutes, and it can bake in the oven unattended.
3. Next time, I would choose a shallow baking dish. Using the Pyrex bowl that I did, the puff took too long to bake and as you can see, the edges started to brown too much before the middle was fully cooked. Using a shallow dish would help the puff to cook more evenly.

Some other recipes from The Sunlight Cafe that I found on other blogs/ websites, for those who have a sweet tooth...
Chocolate Babka,
Chocolate Ricotta Muffins (from our very own Mika!),
Chai Oatmeal,
and a trio of recipes: Smoothie, Fruit Salad and Pumpkin Muffins

Like eggs for breakfast? Here are my three favorite recipes:
Egg Onion Float
Indian Railways Omelet Sandwich
Pateta Par Eeda

Monday, March 19, 2007

Rolling with the punches...

polpat
A few years ago, I was at a dinner party in NYC and met a wonderful German couple. It turned out that they were both vegetarians and enthusiastic home-cooks, and over the course of the evening, they asked me many questions about Indian food. One of the things they asked was, "Tell us, do you have the recipe for making the perfect roti"? I replied, "The dough is simply flour and water, with a touch of salt. Then you have to make rotis every day for 10 years, and you will know how to make the perfect roti". I was only half joking. The world's breads only call for the simplest of ingredients- flour, water, a touch of salt, sometimes yeast- but it can take years of practice, practice, practice to get them right.

The perfect roti is a sublime creation. Hot from the griddle, meltingly soft, it is one of life's simple pleasures to tear a piece off the roti, wrap it around a delicious curry and savor the taste of pure whole-wheat goodness. If I have one burning desire as a home cook, it is to learn how to make the perfect roti. The picture above shows the simple tools of roti-making, and I know the Marathi names for these: a small platform for rolling, called polpat (this is usually wooden, but mine is made of metal, and I do love how easy it is to clean), and the rolling pin or latne (called a belan in Hindi).

During all those years in NYC, my tiny kitchen (see the end of this post) made it genuinely difficult to make rotis on a routine basis. But starting with my move to St. Louis (and to a slightly bigger kitchen), I have been making rotis every 3-4 days with dogged determination. I know that, devoid of any inborn roti-rolling talent, my only choice is to persevere. This is what I have learnt so far.

1. Making the dough: Roti dough contains whole-wheat flour (the finely-ground Indian kind, called chapati flour or atta), water and a touch of salt. I use 2 cups of flour for 12 small rotis (perfect for serving 2 piggies or 3 normal people). When I tried adding any quantity of oil into the dough (with the intention of making it softer), I ended up with poor results. So I don't add any oil whatsoever to the dough. The dough is easily kneaded by hand, but I like using my food processor (with the dough blade). If you do use a food processor, please learn from my mistakes: I would place the flour and salt in the bowl, pulse it together, then leave the motor running and dribble in water through the feed tube until the ball of dough came together. This was a mistake. By the time the ball of dough comes together in the food processor, it is too wet! Now, I just dribble in water until the mixture is "pebbly" and forming small clumps of dough. Then, I take the mixture out and knead by hand for 5 minutes without adding any more water. Once a soft, springy ball of dough is ready, set it in a bowl, cover the ball with a damp cheesecloth and then place a cover on the bowl. Let it rest for 30 minutes.

2. Getting ready:
roti1
I have two containers dedicated to the roti-making process, as shown above. One contains atta, for sprinkling on the dough and on the surface while rolling it out. The other contains some oil (I use olive oil, you can use any vegetable oil or ghee if you feeling luxurious) to brush on to the finished rotis. I keep these containers handy, then place a griddle on the stove (cast iron is best, but I still don't own one, and make do with a non-stick pan instead).

3. I start by kneading the rested dough again for 2-3 minutes, then divide the dough into 12 little balls. Pat down the dough, score into quarters, then divide each quarter into 3 equal pieces, like so:
roti2

4. Dip each ball into the flour, dust off the excess then use the platform and rolling pin to roll it out evenly into a thin circle. I don't know what to say about this bit, other than, it is taking me some time to master! I then bake the roti on a hot griddle, without adding any oil, until brown spots appear on each side.
roti3
Now place the roti directly on the flame for a few seconds on each side. It will puff up (hopefully) and cook to perfection. This can be done either by lighting a second burner (on a low flame) or pulling the pan off for a few seconds at a time and using the flame under the pan. Usually, if I am making rotis alone, I light a second burner. But often, V and I make rotis together...I roll them out, and he roasts them, and in this situation, he can easily pull the pan off and use the same flame for the final puffing of the roti.

5. Finally, once the roti is cooked, I brush on a tiny bit of oil. So the roti only gets a touch of oil at the very end (not in the dough and not while cooking).
roti4

That is my little roti-making story. Right now, my rotis stand at a B minus, they are quite soft and edible when fresh but get hard and chewy in a few hours. Ask me in a few years, and I hope to proudly tell you about my A plus rotis! :) Meanwhile, if anyone has a tried-and-tested tip for improving my roti skills, I will be grateful for your advice.

Coffee of My Khazana of Recipes hosts a fun monthly event called Monthly Blog Patrolling. The premise is that you patrol the blogosphere, make a recipe from another blog and write about it. This month's theme is Let's Roll, where one has to find recipes that involve the use of a rolling pin! This event was just perfect for practicing my rolling skills. Here are my two entries:

When Asha sent in this delicious Carrot Roti as her contribution to the G of Indian Vegetables, I knew I had to make it right away. It is such a great recipe- taking a nutritious and colorful vegetable like the carrot and converting it into a healthy and tasty brunch. The only change I made in the recipe was to omit the oil from the dough.
carrotRoti
We enjoyed it very much, so thanks, Asha! I know I will be making this roti often.

The second recipe was also a must-try from the moment I saw it on Manasi's blog. She made this delicious Koki, a paratha traditionally made by the Sindhi community of India. I am such a fan of regional recipes, and made it right away. Again, the only change I made was to leave out the oil from the dough. The sesame and grated mango make this paratha completely delicious! I know I will be making this to take along on picnics and trips. Thanks, Manasi!
koki

See you in a few!

Sunday, March 18, 2007

H is for Hariyali Tikki

The myriad cuisines of India all love their vegetables! Veggies are diced and sliced, grated and mashed, stir-fried and curried into hundreds of vegetable dishes. In this series, the A to Z of Indian Vegetables, we take an alphabetical journey through the various avatars of vegetables relished in Indian cuisine. For each letter, we will make a tasty vegetable dish that illustrates one manner in which vegetables are savored in India.

The "H" of Indian Vegetables

The letter H inspired fourteen hearty Indian flavors!

Last week, a lot of entries celebrated G for Green. Well, this week, the green theme continues, because green in Hindi is hara, an H word!

One popular hara food is the hara chana, fresh tender green chickpeas that are smaller than their better-known yellow counterparts. One of the most popular preparations of hara chana is a street food: chickpeas tossed with onions, tomatoes and spices. We have two delicious versions of this dish that can be made right in your own home.

Sushma of Recipe Source makes a crunchy and healthier-than-street-food version by tossing together hara chana with some freshly roasted papad in her Hare Chane ki Chaat. Nice touch, Sushma!

We have another delicious version of Hare Chane ki Chaat from Richa of As Dear As Salt. Richa also shares a great story about an enterprising vendor who sold this street food in Bombay: he could teach marketing gurus a thing or two!

Hara chana is called harbara in Marathi, and Swapna of Swad uses the dried version of these little beans to make a flavorful and nourishing curry called Harbaryachi Usal.

A second popular hara vegetable is the hara pyaz or green onions! Green onions are cooked with an aromatic spice powder into a traditional dish, Hare Pyazwali Gojju by Asha of Foodie's Hope/ Aroma. Read the post for the story behind this dish!

The next hara food used liberally in Indian cooking is herbs. Lakshmi of Veggie Cuisine makes a spicy green paste of cilantro and green chillies and uses it to dress up roasted potatoes to make Hara Alu, with delicious results.

Shivapriya of My Cookbook takes India's most popular herb, the hara dhaniya patta or cilantro, and blends it into a green chutney that dresses up a crunchy Hara Bhara Bhel. Bhel is an ever-popular street food in India and this home-made version is sure to be a crowd-pleaser!

A wildly popular appetizer often seen on restaurant menus is the hara bhara kebab (translates are kebab filled with green). This vegetarian version of the kebab is filled with green goodies like green peas and spinach, as Manasi of A Cook At Heart shows in her mouth-watering recipe for Hara Bhara Kebab.

Sig of Live to Eat also gives us her version of Hara Bhara Cutlets, dressing them up with lots of vegetables, including french beans, spinach and peas. Sig's cutlets are a oft-requested dish at her dinner parties, and they look golden and delicious.

Next, we have two delicious and unusual-sounding H foods!

Sheela of Delectable Victuals takes the exotic route by cooking with some hearts of palm! Sheela was craving a curry that traditionally uses "banana plant stem" but creatively substituted it with some hearts of palm to make Hearts of Palm Molagootal.

When Linda of Out Of The Garden said that she cooked with hyacinth beans, I did not think these beans were familiar to me, but a look at her post reveals that this is another name for my beloved vaal beans! As usual, Linda came up with a unique flavor profile, pairing these beans with some exotic coquito nuts to serve up a dish of Hyacinth beans with Shallots and Coquito Nuts.

We now come to all the regional specialties...

Bee and Jai of Jugalbandi give a beautiful and engaging description of Kashmiri cuisine and make a traditional Kashmiri dish using collard greens, an aromatic stir-fry called Haak.

Anjali of Anna Parabrahma vividly describes the rituals surrounding the festival of hrushi panchami and makes a traditional vegetable dish that is startling in its simplicity, a nutritious curry called Hrushichi Bhaji.

Suma of Veggie Platter makes a traditional dish using the bitter gourd, called hagalakayi in her language, Kannada. She uses the bitter gourd for an authentic sweet-and-spicy Hagalakayi Gojju.

And the final creative contribution to the gallery of H vegetables, a Marathi recipe sent in by enthusiastic reader Prajakta P., who does not have her own blog (yet!) but was kind enough to mail in her entry to me. The Marathi word for green is hirava, and Prajakta made a lovely chutney with green tomatoes (hirave tamato in Marathi). In her own words, and with her own pictures, here is Prajakta:

"Hiravya tamatyachi Chutney
I love ‘Hirave Tamato’ (Green Tomatoes). And don’t miss a chance to buy them when I find a fresh lot. There are just 2-3 recipes I have tried with these, but this green tomato chutney is a favorite with us. The tangy sour green tomatoes, minced in a chutney together with garlic and a good kick of green chillies is just the thing to charge your taste buds. It goes well with any kind of parathas, as well as a condiment with your meals. It does stay good refrigerated for 2-3 days.

1. Take 3 medium sized green tomatoes, medium hot 8-10 green chillies, 10-12 garlic pods and a handful of cilantro. (You might need to change the quantities of chillies and garlic according to your taste, more the hotter!!).
IMG_0201
2. Wash the tomatoes, chillies and cilantro.
3. Chop the tomatoes in big chunks. No need to chop chillies, garlic or cilantro.
4. Heat 2 tbsp of oil, add mustard seeds. When they splutter, add half a spoonful of whole jeera.
5. Add chillies and garlic together, follow it with the tomatoes in about 5-10 seconds. Cover and let this all cook (Till the tomatoes are just a little bit cooked and not at all pulpy). About, till the water from the tomatoes dries up a bit, caramelizing with it the chillies and garlic. Do remember to switch on the exhaust.
6. Once we reach this stage, remove from stove and stand it to cool a bit. While it cools, add salt as per taste and a little bit of sugar.
IMG_0203
When the contents are still a bit warm, add the cilantro and mince all this together. When you open the grinder, the spicy whiff will say it all :).
7. That’s it, the chutney is ready!!
This chutney could also be made using ridge gourd as substitute for green tomatoes. Again delicious!!"
IMG_0210

************************************************************
H is for Hariyali Tikki: Vegetable Appetizers

I'm dedicating my H of Indian Vegetables to appetizers! Let the chocoholics crave their desserts; me, I can forgo dessert any day to make a meal of appetizers. Much to my delight, the contributions today have already set the stage for a meal of appetizers...we already tasted some chana chaat, bhel, kebabs and cutlets today.

Indians take their appetizers seriously. Technically speaking, I should not even be calling them appetizers, because traditional Indian meals are rarely eaten in the sort of "courses" where the appetizers are served as a separate part of the meal. Instead, we enjoy our appetizer-like snacks in every way and all the time. We eat them on the go (in lunchboxes and as street food), as a tasty side-dish with meals, and most definitely at tea-time, when snack-cravings reach a crescendo!

Some of the most well-known vegetable-based appetizers are deep-fried goodies: pakodas are made by mixing shredded vegetables (cabbage, onions, greens) with chickpea flour and deep-frying little morsels or alternatively, by dipping slices of vegetables (potato, eggplant, green pepper) into spicy chickpea batter and deep-frying them. Samosas are little pastries typically enfolding a tasty mixture of potato and peas.

Another category of appetizers are called chaat, a large heterogeneous family of savory snacks that have a few things in common: (a) they are spicy and tangy, always an explosion of flavors; (b) they are commonly sold as street food all over India; (c) once you taste them, you are sure to get hopelessly addicted! When you devour chaat, you are succumbing to the allure of taste, and nutrition is not high on the list of priorities, but the truth is that more often than not, these snacks feature the fresh flavors of cilantro, onion, tomato, green mango, etc., and often feature beans (like green chickpeas, hara chana) and vegetables. Just check the links of fellow bloggers below for some wonderful examples.

I thought H was a pretty difficult letter (I've just been proven wrong by the creative contributions above!) and came up with an appetizer called Hariyali Tikki. Green in Hindi is hara and hariyali translates as greenery. Tikki, I think, refers in general to a round flat shape, and when appetizers are termed tikki, you can be sure you will be served little flat, round morsels of something spicy and delicious. Hariyali tikki is a non-specific mish-mash of green vegetables like spinach and green peas, held together by mashed potato and spiced with ginger, garlic and chilies. The mixture is fried into little patties. I love dredging the tikkis in some chaat masala right before serving them. Chaat masala is a store-bought mixture of all those tangy spices that go into chaats, and it gives the tikkis some extra oomph. You will see that the hariyali tikki recipe is very very similar to the hara bhara kebabs above; all tricky little ways to take some every-day vegetables and transform them into something tasty that everyone will devour!

Hariyali Tikki


tikki
(serves 3-4)
1. Boil 3 medium potatoes. When they are cool enough to handle, peel them and place in a bowl.
2. Cook 2 cups washed spinach. I like to do this in the microwave for a couple of minutes. The water droplets clinging to the spinach provide enough steam for cooking the spinach, I find. Press away any excess water from the cooked spinach, chop and add to the potatoes.
3. Add the following to the potatoes and spinach: 1/2 cup green peas, (frozen works fine), 2 tbsp minced cilantro, 1 heaping tsp kasuri methi (dried fenugreek), 1/2 tsp ginger-garlic, paste, 1 green chili, minced, salt to taste.
4. Mash the mixture together and shape into small oval patties in your palms. If the mixture does not hold together, you may need to sprinkle a tsp or so of cornstarch into the dough.
5. Heat 2 tbsp oil in a skillet (I use a non-stick one) and shallow-fry the patties until golden brown on each side.
6. Sprinkle the patties with chaat masala, and serve hot with ketchup or tamarind chutney.

Variations on the theme
1. This can be a total vegetable-crisper-cleaning recipe. Cook and mash any left-over bits of vegetables and fold them into the tikki.
2. Make stuffed patties for a more festive appetizer. Two ideas for stuffings: a cilantro-mint chutney, and a cheese filling using shredded paneer or any other cheese.

How do you serve this dish?
1. As an appetizer for any Indian meal.
2. Make mini-patties and serve on toothpicks as a cocktail snack.
3. Make larger patties and serve in a burger bun as a veggie burger with a difference!
4. Serve with a chickpea-curry (chana) topping as a chaat (tikki chana).

Fellow bloggers have come up with many delicious vegetable-based appetizers. Here are some of my favorite finds:

Two classic Indian appetizers, found on Indian restaurant menus across the globe...
Samosa from My Khazana of Recipes,
Pakoras from The Traveler's Lunchbox.

A Gujarati classic...
Handvo from Aspiring Annapurna,

A regional specialty...
Pathrado from Keep Trying,

An easy way to convert a host of vegetables into appetizers: mash them and shape into tasty cutlets, like these...
Raw Banana Cutlets from Ahaar,

Street food made at home...
Aloo Tikki and Corn Bhel from Sailu's Food.

All appetizers deserve to be dipped into tasty chutneys...
Palette of Chutneys from Saffron Hut.

Previously on the A to Z of Indian Vegetables...
A is for Aloo Gobi: North-Indian Stir-Fry
B is for Bharli Mirchi: Stuffed Vegetables
C is for Carrot-Cashew Payasam: Desserts
D is for Dum ki Arbi: Dum Style of Cooking
E is for Egg-Fried Rice: Rice and Vegetables
F is for Foogath: South-Indian Stir-Fry
G is for Gobi Paratha: Vegetables in Breads

Friday, March 16, 2007

WHB: Falafel Bliss

This little post is my entry for Weekend Herb Blogging, a weekly event started by Kalyn that encourages food bloggers to talk about herbs and spices, fruits and vegetables. I use WHB as an excuse to bring new foods into my kitchen and explore their uses. This week, the host for WHB is Becky from Key Lime and Coconut!

My journey to falafel bliss has been a long winding road! The first time I tasted falafel was in the early years of grad school. At that time, I shared my apartment with a wonderful neuroscience student named Steph (also a vegetarian), and she and I took turns cooking dinner for our little family (and for the assortment of friends and neighbors who dropped in from time to time). We worked long hours and earned little, but ate like princesses, huge hearty gourmet meals cooked from scratch. Well, almost. Every couple of weeks, Steph would make falafel from a boxed mix. It was really quite good (or so I thought at the time), and we would generally enjoy it with some store-bought hummus or plain yogurt. Falafel is a very popular street food in NYC, and I often ate it on the run while out shopping in the city from the little carts on street corners.

What kept me from trying to make falafel from scratch was the fact that I did not own a food processor. Now that I do own one, I wanted to revisit falafel and try making my own. After all, it is a delicious and nutritious sandwich, and a crowd-pleaser at that. So, off I went on a google search for a good recipe and boy, did I strike gold with this recipe! It is called My favorite falafel recipe, and all I have to say is, Mine, too!.

Falafel is the easiest thing in the world to make, but you just need to plan ahead a little bit. The recipe calls for soaked chickpeas, which takes about 8-10 hours if you soak in cool/warm water and 4-6 hours if you use boiling hot water. The idea is get the chickpeas rehydrated all the way through. I liked a tip that I found on this website: To check is the chickpeas are soaked all the way through, cut one open. If the color is even, without a chalky center, then it is fully soaked.

I followed the falafel recipe to the letter. The soaked raw chickpeas are placed in a food processor with other aromatic goodies like herbs, garlic, onion and cumin. A few pulses later, you have a beautiful mixture. Then a bit of flour and baking powder is sprinkled and the mixture pulled together into a ball that rests in the refrigerator for a few hours. This means that you can get all the prep done ahead of time. When you are ready to serve the falafel, heat up some oil and fry them up. I was very impressed by how non-greasy the falafel were, once they were drained onto paper towels! Do keep the oil on medium heat (and not high) so that the outside of the falafel does not get browned too quickly, before the inside gets cooked.
falafel

The true highlight of our falafel meal was the tahini sauce. A Mediterranean restaurant around the corner here serves their falafel with a choice of hummus or yogurt sauce. I really enjoyed the yogurt sauce and wanted to recreate it at home. Tahini is probably a staple in many kitchens, and an everyday ingredient for some, but I never really had to buy it before now.
tahinijar
All tahini is, is a paste of roasted sesame seeds. It has the consistency of peanut butter, as one might expect, and is glossy and unctuous. The recipe for the tahini sauce comes from one of the reviewers of the falafel recipe. Thank you, pastagirl9 from cincinnati, whoever you are, for this wonderful recipe:

Whisk together 1/2 cup yogurt (I used low-fat), 1/2 cup tahini, 2 tbsp lemon juice, 1 minced garlic clove, 1/2 tsp cumin powder and salt to taste. Add a few tablespoons of water if the sauce looks too thick.

That's it. When I made this sauce and tasted it, I danced a little jig around the kitchen. It was so good, I knew the whole falafel party was sure to be a success just based on that one sauce.
tahini

The final touch for the falafel sandwiches: a simple salad. Cut the following vegetables into small dice: 2 seedless baby cucumbers, 3 plum tomatoes,, half yellow bell pepper, half red bell pepper and half onion. Toss the vegetables with salt, pepper, minced parsley, minced cilantro and a dash of fresh lemon juice.
salad

Finally, to assemble falafel sandwiches, simply toast some pita pockets (I used whole-wheat for the lovely taste, store-bought though). Slip 2-4 falafel into the pita, then garnish with lots of salad and a generous drizzle of the tahini sauce. Serve right away. The taste was so authentic and spot-on! Next time, I'm going to try making my own pita bread.

Falafel is a great option for feeding a crowd, like I did...I doubled the recipe, set everything out and let people assemble their own sandwiches, and everyone enjoyed every bite. The tahini sauce is so delicious, in future I will use it as a dip for a platter of vegetable crudites and pita chips. You can leave the pita bread out and simply serve the falafel with salad and tahinin sauce as an appetizer. I'm so glad I found this recipe!

P.S.: I'm excited to be Bookworm of the week over at The Perfect Pantry. Thank you, Lydia, for the opportunity to share my favorite food-related books! You just made my day!

Tuesday, March 13, 2007

Monthly Mingle: Instant Dhokla

The theme for Meeta's Monthly Mingle this month is Savoury Cakes. After thinking of spicy cornbread and olive breads and this lovely cheese bread that our Italian friend BG once baked for us, I came full circle to the savoury cake I love best: dhokla. I know Meeta will get several dhokla recipes in her round-up, and here, I'm adding my very first experiment with making dhokla at home: Instant Microwave Dhokla.

In snack shops in Bombay, a very prominent sight is a huge tray on the counter piled high with squares of a delicate and spongy yellow savoury cake called dhokla. They disappear just as fast as a tray of gooey fudge-y brownies would in the US. Dhoklas come from the Gujarati tradition, and are one of the icons of that snack-loving cuisine.

A fermented batter made of seasoned chickpea flour is steamed into a spongy cake, then drizzled over with a spicy tempering mixture, "the icing on the cake". Gujarati food is famous for a touch of sweetness in every savory dish, and dhokla is no different. The mild sweetness in dhokla comes from either the addition of some sugar to the batter or by sprinkling the steamed cake with some sugar-water. Dhokla can be eaten by itself, or dipped into a sweet or spicy chutney. Some of the tastiest versions I have tasted are the sandwich dhoklas, layers of dhoklas sandwiched with green (chili-cilantro) chutney, in the manner of "layer cakes".

Short of actually fermenting the batter, instant dhokla can be made (just like a quick bread) with chemical leavening agents. One that is frequently seen in dhokla recipes is a brand called Eno's fruit salt, a combination of citric acid and sodium bicarbonate (baking soda). When added to a batter (that is, in the presence of water), these two powders chemically react and release carbon dioxide, and the bubbles trapped in the batter result in a lovely sponge.

The recipe I decided on comes from Tarla Dalal's Microwave Desi Khana (desi is a term for "Indian" and khana is simply "Food").
.
This booklet is a cute little resource for making a bunch of Indian dishes entirely in the microwave. In the microwave, the dhokla is neatly made in 4 minutes or so. The recipe called for citric acid crystals to add tang to the batter and I was able to buy these in the Indian section of the international market. I could not find the Eno's fruit salt, and just substituted equal parts of citric acid and baking powder. Microwaves can vary quite a bit, so you may have to adjust the time required to cook the dhokla in your microwave. The tempering is an essential component of the dhokla. To my palate, the crunchy sesame seeds in the tempering are the best bit!

Instant Microwave Dhokla


dhokla
(Adapted from Microwave Desi Khana by Tarla Dalal, makes 6 wedges, serves 2-3)
1. Grease/ Spray a microwave-safe bowl with vegetable oil and set aside. I used a 4-cup round Pyrex bowl.
2. In another bowl, combine 1/2 cup besan (chickpea flour), 1 tbsp rawa (semolina), 1/4 tsp citric acid crystals, 2 tsp sugar, 1 tsp finely minced ginger, 1 finely minced chili and salt to taste. Stir to mix, then add 1/2 cup water and mix well.
3. Combine 3/4 tsp baking powder and 1/4 tsp citric acid, then sprinkle it on the batter. Sprinkle a tablespoon of water on the powder to get the reaction started. Stir it gently into the batter, you will see merry bubbles forming!
4. Microwave on HIGH for 2 minutes or until the surface no longer looks very wet. Let the bowl stand for 2 more minutes (it will continue to cook during this time). At this time, the dhokla cake will leave the sides of the bowl. Invert onto a serving dish.
5. Meanwhile, prepare the tempering. Heat 1 tbsp oil, then add 1 tsp mustard seeds, 1 tsp cumin seeds, pinch of asafoetida and 1 tbsp sesame seeds. Take the tempering off the heat, stir in 2 tbsp minced cilantro and pour the tempering mixture over the dhokla. Cut into wedges and serve warm.

The verdict: While this is an instant microwave dhokla and will never taste exactly like the real thing, it still tastes great! I am very glad to add this recipe to my repertoire for a hot and tasty snack that is ready from start to finish in under 10 minutes. It will definitely satisfy tea-time cravings and feed friends who drop in unexpectedly. I think it tastes just fine by itself, but of course it would be even better with some tamarind chutney or green chutney.

Thanks, Meeta, for hosting! I'll be back in a couple of days, with another recipe prominently featuring sesame. Any guesses?

For the round-up, featuring a multitude of tasty savory cakes, click here!

Sunday, March 11, 2007

G is for Gobi Paratha

The myriad cuisines of India all love their vegetables! Veggies are diced and sliced, grated and mashed, stir-fried and curried into hundreds of vegetable dishes. In this series, the A to Z of Indian Vegetables, we take an alphabetical journey through the various avatars of vegetables relished in Indian cuisine. For each letter, we will make a tasty vegetable dish that illustrates one manner in which vegetables are savored in India.

The "G" of Indian Vegetables

The letter G inspired fourteen gorgeous Indian flavors!

First, a bountiful harvest of verdant vegetables, many of them the lush shade of green.

We start with Green Beans, also called French beans or haricots verts, those tender pods that are so versatile in Indian cooking. Usha of Samayal Ulagam stir-fries the fresh green beans with some toor dal for some extra oomph and ends up with this delicious Green Bean Poriyal.

Sheela of Delectable Victuals talks about her lovely kitchen garden and how she had to harvest her lovely grape tomatoes while they were still green and unripe. She cooks these tiny, gorgeous Green Grape Tomatoes into a delicious and filling Green Grape Tomato Rice.

A beloved tropical fruit/vegetable all over the coastal regions of India is the Green Jackfruit. The sight of these gigantic prickly green fruits swaying from the high branches of a jackfruit tree is quite a spectacle (and just a little bit scary)! Here, canned jackfruit is cooked into a quick and easy Green Jackfruit Curry by Sheela of Delectable Victuals.

Another tropical green vegetable, nah, fruit, follows: the mouth-puckering, tender Green Mango. In India, this (mid-March) is just about the time when green mangoes make their appearance in the market, at least where I come from, and people are busy considering what pickles and chutneys and relishes to make this year.Linda of Out Of The Garden found a stash of green mango in brine (it looks so juice and tender) in her fridge, and promptly converted it into a wholesome Green Mango Dal.

Next come the ever-popular Green Peas. Although fresh green peas are not very easy to find, frozen green peas are an excellent ingredient to stash away in the freezer, with handfuls ready to be used at any time. We have two recipes featuring these little pearls, each pairing green peas with another vegetable.

Green peas make a delightful appearance in a tasty curry of Green Peas with Capsicum by Swapna of Tastes From My Kitchen.

The other green peas recipe is also by a different blogger with the same name! Swapna of Swad makes a juicy curry of Green Peas with Mushrooms.

After all these green vegetables comes a bright orange one! The carrot or Gajar is abundantly harvested during the winter months in India. Here in the US, I find that carrots are one vegetable that are inexpensive, easily available and lend themselves to a thousand delicious uses. Here are two carrot recipes: one for brunch and the other for dessert.

Asha of Aroma/ Foodie's Hope starts the day right with a veggie-rich breakfast. She combines carrot and whole-wheat flour to make these nutritious and pretty Gajar Masala Rotis, which she serves with a chutney made with another "G" vegetable/spice, Garlic!

Meanwhile, carrots are a sweet treat at the end of a meal. Cooked carrots combine with almonds and cashew nuts into a creamy and rich Gajar Kheer, made by Suma of Veggie Platter.

Our next vegetable is on my shopping list every single week: the Gobi or cauliflower, with its beautiful off-white florets that pack a nutritional punch. We have two Gobi curries from two different regions of India.

Lakshmi of Veggie Cuisine roasts some cauliflower florets and then cooks them in a Northen-Indian style tomato-based curry to create the decadent Gobi Masala.

Sandeepa of Bong Mom's Cookbook makes an exotic Bengali dish called Chaal Kopi or cauliflower cooked in spices with a smattering of rice, studded with peanuts and raisins. Sandeepa also shares some valuable career advice given by her little girl...you just have to read this post!

We now come to a vegetable is usually used more like a herb or spice, and is indispensable in Indian cooking: the knobby but delicious Ginger! It is the star ingredient in a spicy, sweet-and-sour treat of a Ginger Curry made by Sigma of Live to Eat. This dish is a traditional one from the Southern Indian state of Kerala, and Sigma shares her Mom's recipe, which is simplified, yet has a unique blend of flavors.

With all this talk of vegetables, let's not forget the chickpea or Garbanzo Bean, a valuable source of protein in the vegetarian diet. Here, we have a traditional family recipe for "chole" or Garbanzo beans in a spicy gravy shared by Pinki of Desi-Fusion Corner.

We end with two more delicious regional specialties!

The first is a popular dal from the Southern Indian state of Andhra Pradesh. Shivapriya of My Cookbook uses the sunshine-hued pumpkin, called Gummadikaya in Telugu (the Andhra language) and cooks it into a beautiful, nutritious dal called Gummadikaya Pulusu.

The second regional favorite comes from the Western Indian state of Gujarat. Gujarati food is famous for its delicious snacks and appetizers, such as the ghugra, little boat-shaped turnovers that are plump with a filling of spiced peas. Bee and Jai of Jugalbandi share their recipe for a oven-baked ghugra, made with whole-wheat flour to add to the taste and nutrition!

************************************************************

G is for Ginger-spiced Gobi Paratha: Vegetables and Bread

Grains form the basis of any diet, and in that respect, one might consider India to be divided horizontally down the middle: the upper (Northern) part of India is predominantly a wheat-growing region, and breads, mostly flatbreads, feature prominently in the traditional diet. India is a peninsula, and the whole Southern part has a coast, and is predominantly a rice-growing (and consuming) region. In the middle of the country, where I am from, I grew up eating a little bit of bread and a little bit of rice at every meal, a very satisfying compromise! Times have changed, and today, people all over India enjoy both wheat and rice, but the best traditional recipes reflect these regional differences, with bread recipes usually deriving from Northern India.

Breads in Indian cuisine are a world all on their own. Most Indian breads are made with whole-wheat flour that is ground to a finer consistency than the whole-wheat flour sold in the US. We call it atta, but you may also find it being sold as chappati flour. I remember, growing up, that we never bought flour from the store, we bought whole kernels of wheat instead. These would be taken to a local grain mill, where, for a small fee, they would pour your grain into an industrial-strength mill and give you freshly ground flour made right in front of your eyes. What a way to ensure quality and freshness! When you said whole-wheat, you meant just that, nothing more and nothing less. Anyway, I do think that the atta you buy here is basically packaged flour that is made the same way, by grinding whole wheat grains and not robbing them of any nutrition.

Where do the vegetables come in? Many delicious recipes combine cooked, spiced vegetables and the whole-wheat dough into one tasty bread. In general, I can think of two major ways in which this is done. In the first, easier, method, the flour is mixed in with vegetables (typically, chopped greens or mashed vegetables) and spices to make one dough. Then the dough is rolled into breads that are griddle-baked with a little oil or ghee. In the second type, the dough is kneaded with just flour, water and salt, and a separate filling of spicy vegetables is cooked. Then, while rolling the dough, the filling is encased in the dough, and you get a delicious stuffed paratha with vegetables hiding in layers of flaky griddle-baked dough.

Some of the most popular stuffed parathas come from the Northern Indian state of Punjab; one is the aloo paratha (paratha stuffed with potato) and the other is the gobi paratha (stuffed with gobi or cauliflower). For the G of Indian vegetables, I took some gobi and paired it with ginger (a match made in culinary heaven) and made stuffed parathas. Madhur Jaffrey's book, World Vegetarian, provided help in two ways: (a) she suggests that olive oil can be used to make this paratha: in the dough, to stir-fry the filling, and to cook the parathas. This is quite a bit healthier than the traditional fat (ghee), especially for breakfast! The flavors of the paratha are bold enough that I thought olive oil worked very well here. (b) Her recipe was useful for determining the proportions of filling and dough that I needed for this recipe.

I find stuffed parathas quite a challenge to make. I do not consider them a recipe for beginners. To roll out stuffed parathas into thin perfect circles without letting the filling spill out is not the easiest thing, but the only way is practice, practice, practice :) A soggy filling can ruin the paratha-rolling effort, so the filling should be as dry as possible. My parathas are still not as thin as I would like them, but they manage to taste good, so what if they are a bit thick and imperfect?

Gobi Paratha


GobiParatha
Recipe adapted from World Vegetarian by Madhur Jaffrey; Makes 5 filling parathas.
1. Make the dough: Mix 2 cups atta (see recipe introduction), 1/2 tsp salt and 1 tbsp olive oil. Add enough water to make a soft dough and knead it for 10 minutes until it is smooth and elastic. Cover with a damp towel and set aside in a covered bowl for 30 minutes.
2. Make the filling: This is easily done while the dough is resting. You need 2 cups of finely minced or grated cauliflower, one minced fresh green chili and 1 tsp minced fresh ginger. Heat 1 tbsp oil in a skillet. Add 1 tsp cumin seeds, chili and ginger and stir until fragrant (few seconds). Add the grated cauliflower, 1/2 tsp turmeric, 1/2 tsp ajwain seeds (carom seeds, optional), salt and pepper to taste and stir well. Cook on low heat, uncovered, until the cauliflower is tender. You want the mixture to be very dry.
3. To make the parathas, knead the dough again for two minutes and then divide it into five portions, like so:
Dough

In the skillet, divide the filling roughly into five portions too:
Filling

Take a portion of the dough and roll it out into a fat circle (try and make the edges of the circle thinner than the center). Place one portion of the stuffing in the middle and pull up the edges to cover the filling. Press down flat and roll it out gently into a flat evenly-thick circle. Fry the paratha in a hot griddle, using a few drops of olive oil to fry each side until it is golden and well-cooked.

Left-over parathas can be refrigerated. Simply heat them in a toaster oven until they are sizzling hot and they will be as good as new.

Variations on a theme
1. Use ghee or butter to fry the paratha for a decadent treat.
2. Stuff the paratha with any combination of vegetables of your choice; it should work as long as the vegetables are minced finely/ grated and the filling is fairly dry.

How do you serve this dish?
Stuffed parathas can be devoured in endless creative ways. Here are a few...
(a) Simply serve the gobi paratha with Indian-style pickles or relishes and a cup of yogurt for a delicious breakfast, brunch or lunch. As the picture above shows, I served the paratha with some store-bought Punjabi pickle, an amazing blend of spices and some everyday vegetables like carrot, lime, raw mango, and some unusual ones like lotus root and fresh turmeric root.
(b) Cut the paratha into quarters and serve as part of a larger brunch buffet.
(c) Wrap the paratha around salad and eat as a...well, wrap!
(d) Make a "panini" by wrapping the paratha around a slice of cheese and grilling it.
(e) Cut the paratha into wedges and serve as an appetizer with some chutney as a dip.

Fellow bloggers have come up with many delicious Breads featuring Vegetables:

Potato-stuffed paratha, probably the most popular type...
Potato-Pea Paratha from Manpasand,
Quick non-stuffed potato paratha from My Khazana of Recipes,

Two breads with nutritious greens...
Spinach Cheese Paratha from Saffron Hut,
Radish Greens Paratha from The Cook's Cottage,

Two unusual creations with bread...
Beet Bread Roll from Bong Mom's Cookbook,
Avocado Paratha from Spice is Right,

Previously on the A to Z of Indian Vegetables...
A is for Aloo Gobi: North-Indian Stir-Fry
B is for Bharli Mirchi: Stuffed Vegetables
C is for Carrot-Cashew Payasam: Desserts
D is for Dum ki Arbi: Dum Style of Cooking
E is for Egg-Fried Rice: Rice and Vegetables
F is for Foogath: South-Indian Stir-Fry

Wednesday, March 07, 2007

WHB: Madhur Jaffrey's Lubia Polo

This is my entry for Kalyn's weekly event that inspires food bloggers to talk about their favorite herb, spice, fruit or vegetable: Weekend Herb Blogging. I use this event as an excuse to bring new foods into my kitchen and explore their uses. This week, WHB is hosted by the lovely newly-wed Anna of Morsels and Musings. Congratulations, Anna!

For someone who is pretty much obsessed with cooking and eating, my cookbook collection is a fairly tiny one: about 20 cookbooks and a few booklets. All but one have been gifts from encouraging friends and family (the only one I actually bought is Dakshin). In a couple of cases, "gifts" is a euphemism for "stolen from my mother when she was not looking". I tend to use my cookbooks for two things: the glossy ones to moon over, and the others as sources of ideas and inspiration. To be perfectly honest, it is only in the last couple of months that I have had the time to read through my cookbooks and really start using them. And one book is turning out to be a perfect treasure, and perfectly indispensable: Madhur Jaffrey's World Vegetarian.

I first jotted down some recipes from World Vegetarian when I borrowed it from the public library a few years ago, and then, when my friend Anu gifted me a B&N gift card, I ran out and bought the book. Madhur Jaffrey has managed to collect hundreds of the most interesting home-style recipes from all around the world, and neatly divided them into sections such as beans and legumes, vegetables, grains and dairy. It hardly matters if you are a meat-eater or not- if you are looking to eat more grains, beans and vegetables (and really, we all should be), this book will provide you with endless (a) tips on buying, storing and preparing these foods, for instance, 5 methods for cooking eggplant, (b) ideas on using these ingredients. I find myself turning to World Vegetarian constantly to find creative uses for, say, the big bag of kidney beans in the pantry or the extra cauliflower in the vegetable crisper.

The recipe that I am about to make today from this book comes from Iran. It is called Shamsi Davis' Persian Pilaf with Lime and Green Beans, or Lubia Polo. I am a sucker for layered rice, and this pilaf sounds so good: You make a delicious curry of green beans with some dried Persian limes. Then, you layer thinly-sliced potatoes, rice, and the green beans and cook it together into one heavenly pilaf.

What really intrigues me were the dried Persian limes that add a tangy note to this dish. In Indian cooking, we use so many different ingredients to add that tang: tamarind, mango powder, kokum, and of course, fresh lemon and lime juice. But not dried limes as far as I know.

In Jaffrey's words "Persian dried limes are a world unto themselves. Once you have discovered them, you will wonder how you ever lived without them". I don't need much convincing. That was enough to make me buy a bag on my last trip to the International market (they are very cheap, by the way).

The dried limes look, um, unimpressive, to say the least. Exactly like limes that have been sitting around for too long and have dried-up and shriveled. In my kitchen, these would be hastily thrown into the trash, but the Persians seem to know something that I don't.
lime1

Here are the three stages in the extraction of lime-y goodness: The whole dried limes are hard, dry and hollow. I used a hammer to split each into half or thirds. The minute you do that, you can smell a deep lime aroma, that to me, smelled like the delicious Indian lime pickles, and to V, smelled like some dried berries used in South Indian cooking. Anyway, the insides look awful and smell delicious (you can see the halves in the picture). Then, use your fingers to scrape out the black dried stuff (bottom right of picture) and discard the seeds.
lime2
Collect the dried pulp from 2-3 limes in a bowl, then run it through a spice grinder to powder it. This is the lime powder that you need for this recipe. You could use fresh lime juice as a substitute.


Persian Lime-Green Bean Pilaf
(Lubia Polo)

polo1
(Adapted from Madhur Jaffrey's World Vegetarian, serves 3-4)


1. The Rice: Rinse 1 cup Basmati rice 3-4 times in cold water, then boil in 2 cups water (lightly salted) until *just short* of tender. Drain well and set aside. The rice will be cooked again, so it should remain undercooked at this point.

2. Vegetable filling: Wash 2 cups of green beans (also called French beans or haricots verts) and cut them into thirds or so. Heat 1 tbsp. oil in a skillet. Saute 1 small chopped onion until lightly browned. Add the beans and saute for a few minutes. Now add 1/3 cup tomato puree, salt to taste and 1 tsp. garam masala (Jaffrey's recipe calls for cinnamon). Simmer the beans until tender, by which time the mixture should be quite thick. Turn off the heat. Add 1 heaping tsp. powdered dried lime or 1 tbsp. fresh lime juice and set aside.

3. Layering: In a non-stick pan, melt 1 tbsp. butter. Stir in 1/2. tsp turmeric and 1 tbsp. water. Layer the bottom of the pan with thin slices of peeled potato. Now gently layer the potatoes with half the rice, then the entire bean mixture, then the rest of the rice.

4. Cooking: Cover the pan and leave on medium heat for 10 minutes, then lower the heat to lowest point. Place a dish towel on the pan, under the lid (to absorb condensation), being careful to fold the edges of the towel over the lid so that it cannot catch on fire. Cook on low heat for 20 minutes, then let it rest for 5-10 minutes. The idea is to allow the potatoes to cook and brown, and for the rice around the edges to become brown and crisp. The time given here worked well in my kitchen, but may change for a different-sized pot and a different stove. Invert gently onto a serving plate. A non-stick pan makes this easy. Cut into wedges and serve!

polo2

The Verdict: We loved it. This was one special meal. I don't think the pictures quite do justice to how pretty this dish looks. The combination of juicy, tangy beans, rice and browned potatoes is just delicious. This recipe is a must-try! I know I am going to play around with the dried limes and try and find more uses for them.

I just realized that I have posted an upside-down recipe twice in 10 days! At least this one is savory and quite different from the first. Meanwhile, green beans represent "G", and we shall meet again on Sunday for the G of Indian Vegetables.

Monday, March 05, 2007

A United Voice Against Plagiarism


(Icon credit: Sandeepa of Bong Mom's Cookbook).

What is plagiarism? In simple terms, it is to steal someone's ideas or work and pass it off as one's own without giving them due credit. Plagiarism is serious business; it is morally wrong and often illegal as well.

As a food blogger, I pen down my thoughts, try my hand at food photography, share my favorite recipes...and it is all in the spirit of learning to write, photograph and cook. We live in a world of relentless consumerism, and I want this little blog to be a tiny oasis where there are no commercials and you can enjoy the contents absolutely free. Where the world revolves around money, food blogs exist simply for the love of cooking and the joy of sharing.

But you know what hurts? When someone else, often a big corporation with pots of money, steals your words and photographs and uses them for their own commercial purposes. A small-time stand-alone blogger gets no recognition, no compensation, nothing. This is exactly what happened recently when Yahoo India started a regional language portal and blithely stole contents from blogs without giving them any credit, let alone any compensation. This, from a multi-billion dollar enterprise. How shameful is that? Read the story here.

Recently, a picture from this blog ended up plagiarized on Wikipedia. I was alerted of this by a vigilant reader (thanks!) and I am grateful to Wiki for removing the picture immediately once I e-mailed them about the situation. But I can tell you the surge of anger that went through me when I saw my (humble, unprofessional, but mine nonetheless) work being displayed without attribution. There was also an incident recently where I saw my pictures being displayed on another food blog (ironically, I discovered this when the blogger mailed me asking for a link). When I contacted the blogger, she told me that she found them via a google image search, and that she had mailed google asking *them* for permission to use *my* images! So, it can happen out of a lack of understanding too.

Today, we are coming together to protest plagiarism. I urge everyone to:
a) be aware of plagiarism and that it is a serious offense.
b) be vocal against it, whether it means taking on a corporate giant or an individual.
c) let someone know if you see their work being plagiarized.

If you ask nicely and give credit, most times a blogger will be delighted to share his/her work. I know that I have given permission many times for my content to be used in other media (and never asked for any financial compensation, just for my name to be credited). For my part, I pledge to be vigilant and ensure that I do not unintentionally plagiarize anyone else's work. Thanks for listening, everyone!

Sunday, March 04, 2007

F is for French Bean-Fulgobi Foogath

The myriad cuisines of India all love their vegetables! Veggies are diced and sliced, grated and mashed, stir-fried and curried into hundreds of vegetable dishes. In this series, the A to Z of Indian Vegetables, we take an alphabetical journey through the various avatars of vegetables relished in Indian cuisine. For each letter, we will make a tasty vegetable dish that illustrates one manner in which vegetables are savored in India.

The "F" of Indian Vegetables

The letter F inspired ten fantastic Indian flavors!

To start off, the beloved fenugreek, used in Indian cooking in three different avatars: First, as a leafy green vegetable, nutritious and delicious with a pleasantly bitter bite. Second, dried, as a herb known as kasuri methi, where the deep distinctive flavor of fenugreek can be added pinch by pinch. Third, as fenugreek seeds, a spice, often ground into a masala with other spices or added while tempering a dish. All three forms can be found in Indian or international stores. The leaves are usually sold both fresh and frozen.

First up, a delicious appetizer to whet the appetite: Asha of Foodie's Hope/ Aroma used fenugreek leaves combined with cornmeal and spices to fry up some crispy, golden, mouth-watering "Indian-style hush puppies" or Fenugreek Fritters.

Fenugreek leaves team up with radish to make a quick and nutritious Fenugreek-Radish Curry, a contribution by Trupti of The Spice Who Loved Me.

Pinki of Desi Fusion Corner packs a double fenugreek punch by combining fenugreek leaves and the dried kasuri methi with some cauliflower and potatoes to make a wholesome and tasty Aloo Gobhi Methi ka Tuk.

Fenugreek seeds play a leading role in the Fenugreek-Broccoli curry, an unusual preparation, again by Trupti of The Spice Who Loved Me. She says that even her little son loves broccoli cooked this way, which means that this is a must-try recipe for all broccoli-haters!

Want to learn more about fenugreek seeds and their uses? See them featured here by Lydia of Perfect Pantry.

We move on to three additional F vegetables...

First up is fuzzy melon, a wonderful asian squash (new to me) introduced by Pinki of Desi Fusion Corner. Pinki describes the melon and makes a creative dish called Fuzzy Melon ki Sabzzi.

Next comes fennel, that beautiful bulb with a frilly top, and the interesting taste of licorice or anise. Linda of Out Of The Garden creates yet another delightful preparation called Fennel with Toor Dal and Garlic by roasting the fennel and combining it with some garlicky dal. What an amazing flavor profile this dal has!

Finally, a vegetable that is easily available and well-known: french beans. Verdant and crunchy, fresh french beans or green beans certainly are used in countless Indian dishes.

Lakshmi of Veggie Cuisine shares a family recipe for an unusual French Beans Stew. French beans combine with potato and the flavors of ginger and coconut milk...I can just imagine the subtle aroma of this stew.

Suma of Veggie Platter shares another delicious recipe with us: She combines french beans and toor dal to make the vegetable preparation even richer in protein, and comes up with a tasty French Beans Sabji.

I used french beans too, and combined them with another popular Indian vegetable, the cauliflower or fulgobi. In Hindi, cauliflower is sometimes called just "gobi" or then called "fulgobi" (ful= flower) to distinguish it from "patta-gobi" or cabbage (patta= leaf).

Finally, an entry that wowed me by its unusual nature. It reminded me that no matter how many years I spend marveling at Indian regional food, I will keep discovering surprising new preparations. Here, Bee and Jai of Jugalbandi introduce us to Fajeto. A traditional dish from the Western Indian state of Gujarat, it is an unsual curry featuring mango pulp, yogurt and chickpea flour that by all accounts is delicious, delicious!

***********************************************************
F is for Foogath: The simplest stir-fry (South-Indian style)

In my eyes, the most incredible recipes of Indian regional cooking are the delicious vegetable preparations that prompted me to start this series in the first place. Stir-fried vegetables are especially dear to my heart. They require little preparation other than chopping of the vegetables, and they retain the essential flavor of the vegetables while, at the same time, dressing it up with a spicy kick.

One such regional stir-fry is called foogath. I really have no idea what the term means, except that this preparation is from the coastal state of Goa, the land that brings us those other exotic-sounding curries like the "vindaloo" and "cafreal".

A few weeks ago, we made a typical North-Indian stir-fry and now, we are making some foogath, which certainly is a type of Southern Indian stir-fry, judging from the classic combination of mustard seeds and curry leaves. From what I understand, here are the essential components of a good foogath:
1. Tempering with mustard seeds, curry leaves and chilies,
2. Garnish with some grated coconut.

Simple and delicious, foogath is generally made with cabbage or french beans, but I see no reason why one can't make it with, say, cauliflower, or carrots or any combination of vegetables. The dish has a very subtle flavor and you can make it with as few or as many chilies as you like. The vegetables are cooked just until they are tender, so the fresh and delicate of this dish is what makes it so special for me.

Foogath


foogath
serves about 4
1. Prepare the vegetables: Cut half a head of cauliflower into small florets. Cut 2 cups of french beans (green beans) into small pieces (if the beans are not tender, you might have to remove the strings first).
2. Make the tempering: Heat 1 tbsp oil, then add 1/2 tsp mustard seeds, 1/2 tsp cumin seeds, 2 fresh chilies cut into thirds, 1/4 cup minced onion, 5-6 curry leaves. Stir around for a few minutes to infuse the oil with all the spices.
3. Add 1/2 tsp turmeric and salt to taste, stir for a few seconds.
4. Stir in the vegetables. Add 1 tbsp water. Cover and cook on medium-low heat, stirring occasionally, until vegetables are tender. The idea is to let the vegetables steam in their own juices to retain as much of the flavor and nutrition as possible.
5. Turn off the heat. Stir in 2 tbsp grated fresh coconut (can use fresh-frozen). Squeeze on the juice of half a lemon (optional) and garnish with minced cilantro (optional).

The background on the foogath above is a place-mat printed with a drawing from the celebrated Indian cartoonist Mario Miranda. He is based in Goa, and his cartoons and line drawings are infused with the joy and spirit of the people of Goa. Last time I visited Goa, my dear childhood friend Chinu (who lives and works in Goa, the lucky lucky thing) gifted me a set of these place mats.

Here is another one, a more typical representation of Miranda's style, depicting an Indian wedding: check out the disgruntled bridegroom and the gaggle of relatives!
miranda

Goa is a fascinating place and would have to be my favorite destination in India. Some day, I will devote a whole post to this lovely land. With its endless beaches and joyful, laid-back residents, Goa provides an oasis in the hectic frenzy that is India. For some gorgeous pictures of vibrant Goan life and some delicious Goan recipes, you have to visit Mahek's blog.

Another Indian blogger, Deccanheffalump, also writes often of her travels through Goa...for instance, check out this description of a traditional Goan dessert to see why I am such a fan of her writing.

How do you serve this dish?
I love it best with some rice and dal for a simple home-style meal, but it would go well with rotis (flatbreads) too!

Fellow bloggers have come up with many delicious regional stir-fry recipes:

A specialty from the Northern state of Uttar Pradesh (UP)...
Carrots, Peas, and Potatoes with Dill from A Mad Tea Party,

A Marathi stir-fry with peanuts (we Marathis certainly love those peanuts!)...
Nutty Green Beans from Indian Food Rocks,

The popular South Indian poriyal...
Brussels Sprouts Poriyal from Manpasand,

A typical Bengali stir-fry method for greens called shaak...
Radish Greens Shaak from Bong Mom's Cookbook,

A traditional stir-fry from Kerela called thoran...
Spinach Thoran from Malabar Spices,

A Konkani stir-fry style called upkari...
Corn Upkari from Aayi's Recipes.

Previously on the A to Z of Indian Vegetables...
A is for Aloo Gobi: North-Indian Stir-Fry
B is for Bharli Mirchi: Stuffed Vegetables
C is for Carrot-Cashew Payasam: Desserts
D is for Dum ki Arbi: The Dum Method of Cooking
E is for Egg-Fried Rice: Rice and Vegetables